Demo Friday: Getting Started with Ansible
Using Ansible to install Docker and start a "Hello World" NGINX Container

Companion repo for this demo can be found here.
Ansible is an open-source automation tool that helps you configure, manage, and deploy software applications. It is designed to be simple, efficient, and easy to understand, using a declarative language called YAML. In this demo, we will walk through the process of installing Ansible, initializing a new project, and writing a playbook to install Docker and start a "Hello World" NGINX container on a new server.
Prerequisites
Virtual Machine Prep
For this demo, I am using a new Debian 11.7.0 VM. This was provisioned expressly for demo purposes with a SSH server installed. If you want to run through this demo a few times, make sure you snapshot your VM for an easy way to reset it.
Make sure you get the ip address of the VM that you can use to SSH into the machine, you will need it later. For Debian, I used ip addr show.
Also, make sure your user is in the sudoers file. I add the following line to allow for passwordless escalation. Remember, this is a demo, not a production system.
mike ALL=(ALL) NOPASSWD:ALLInstalling Ansible
To use Ansible, you need to install it on your control node, which is the machine where you will run your playbooks. This demo assumes you are using either Linux or MacOS as your control node. Follow the official docs to install ansible on your control node.
When you have finished, run this command:
ansible --versionThe result should be something like:
ansible 2.9.6
  config file = /etc/ansible/ansible.cfg
  configured module search path = ['/home/mike/.ansible/plugins/modules', '/usr/share/ansible/plugins/modules']
  ansible python module location = /usr/lib/python3/dist-packages/ansible
  executable location = /usr/bin/ansible
  python version = 3.8.10 (default, Nov 14 2022, 12:59:47) [GCC 9.4.0]
In order to use our ssh password, we will also want to install sshpass on the control node.
Initializing a New Ansible Project with Ansible Galaxy
Ansible Galaxy is a hub for sharing Ansible roles and collections. It also provides a command-line tool that helps you create, manage, and share your roles. In this step, we will use the ansible-galaxy command to initialize a new role.
First, Create a new directory for your Ansible project:
mkdir my_ansible_project
cd my_ansible_project
Initialize a new role named docker_nginx. This command will create a docker_nginx directory containing the skeleton structure of an Ansible role.
ansible-galaxy init docker_nginx
Create a hosts file to store your inventory of target servers and add your target server's IP address or hostname under a group named '[servers]'.
[servers]
your_server_ip
Writing the Ansible Role Tasks to Install Docker and Start an NGINX Container
Open the tasks/main.yml file located in the docker_nginx directory and replace the default content with the following. As I am using Debian, tasks will be specific to that target. If you are using a distribution with a different package manager, such as yum, you will want to look up the syntax for those tasks as well as other items in this file.
---
# Everything in this file is specific to a debian target.
- name: Install required packages
  apt:
    name: ['ca-certificates', 'curl', 'gnupg']
    state: present

- name: Add Docker GPG key
  apt_key:
    url: https://download.docker.com/linux/debian/gpg
    state: present

- name: Add Docker repository
  apt_repository:
    repo: "deb https://download.docker.com/linux/debian bullseye stable"
    state: present

- name: Install Docker
  apt:
    name: docker-ce
    state: present

- name: Ensure Docker service is enabled and running
  systemd:
    name: docker
    state: started
    enabled: yes

- name: Add docker group
  group:
    name: docker
    state: present

- name: Add user to docker group
  user:
    name: "{{ ansible_user }}"
    groups: docker
    append: yes

- name: Start an NGINX container
  shell: |
docker run -d --name nginx_hello_world -p 80:80 nginx:latestCreating a Playbook to Include the Role
Navigate back to the project root directory and create a new file named docker_install.yml. Write the following playbook:
- name: Install Docker and start NGINX container
  hosts: servers
  become: yes
  roles:
- docker_nginxRunning the Playbook
Now that you have created your playbook and role, it's time to execute the playbook. This command tells Ansible to run the docker_install.yml playbook using the inventory file hosts.
ansible-playbook -u mike -k -b -i hosts docker_install.ymlThe -u sets the ssh user, -k sets up the ssh password prompt, -b allows for privilege escalation to root, and -i sets the inventory file.
This was the output, cleaned up to be readable:
$ ansible-playbook -u mike -k -b -i hosts docker_install.yml
SSH password:

PLAY [Install Docker and start NGINX container] **********************************************************************

TASK [Gathering Facts] **********************************************************************
[WARNING]: Platform linux on host 192.168.0.250 is using the discovered Python interpreter at /usr/bin/python3, but future installation of another Python interpreter could change this. See https://docs.ansible.com/ansible/2.9/reference_appendices/interpreter_discovery.html for more information.
ok: [192.168.0.250]

TASK [docker_nginx : Install required packages] **********************************************************************
changed: [192.168.0.250]

TASK [docker_nginx : Add Docker GPG key] **********************************************************************
changed: [192.168.0.250]

TASK [docker_nginx : Add Docker repository] **********************************************************************
changed: [192.168.0.250]

TASK [docker_nginx : Install Docker] **********************************************************************
changed: [192.168.0.250]

TASK [docker_nginx : Ensure Docker service is enabled and running] **********************************************************************
ok: [192.168.0.250]

TASK [docker_nginx : Add docker group] **********************************************************************
ok: [192.168.0.250]

TASK [docker_nginx : Add user to docker group] **********************************************************************
changed: [192.168.0.250]

TASK [docker_nginx : Start an NGINX container] **********************************************************************
changed: [192.168.0.250]

PLAY RECAP **********************************************************************
192.168.0.250              : ok=9    changed=6    unreachable=0    failed=0    skipped=0    rescued=0    ignored=0
Verify the NGINX Container Deployment
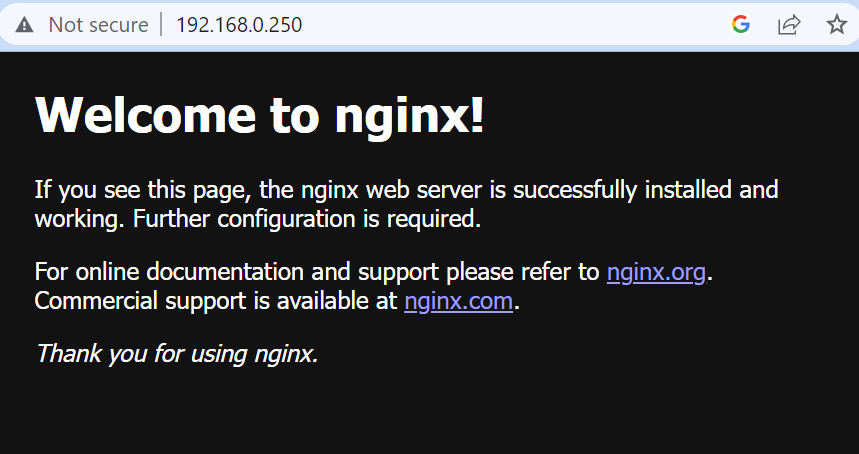
To ensure that the NGINX container is running successfully, access the server using its IP address over http (port 80) in your web browser. You should see the default NGINX welcome page.
If you want to see this from the Docker perspective, you can SSH into the server and check the container status by running docker ps. You should see the nginx_hello_world container listed in the output, with the nginx image and port 80 mapped.
Wrapping Up
Well, we've covered how to install Ansible, create a new project using Ansible Galaxy, and write a playbook and role to install Docker and run an NGINX "Hello World" container on a new server. Using Ansible Galaxy and roles helps you organize your project more efficiently and enables better reusability of your automation code. With this foundation, you can continue to explore more advanced Ansible features and create playbooks to automate a wide range of tasks, making your server management and application deployment more efficient and reliable.